In this article, we will describe a way in which you can do a patient migration (or upload) into Millennium.
Building the Contributor System #
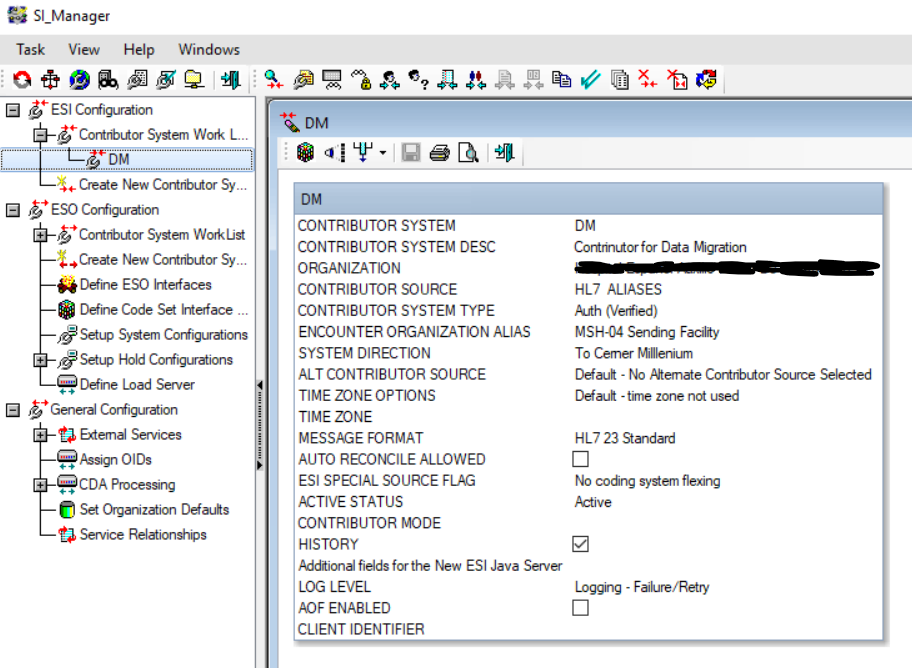
In si_manager, build a new Contributor System. Our Contributor System will be called DM (initials of Data Migration). You can give it any name. The only important thing about the naming is that the Contributor System’s default inbound alias needs to be in MSH-3 (sending application). We will set this alias after creating the Contributor System.
Before creating the Contributor System, you need to identify the following:
- The Contributor Source you will be using. You can also use a alternative Contributor Source even though in this example we are not doing so. In this example, we will be using a Contributor Source called HL7 Aliases.
- The main facility of the environment.
Let’s go through the steps of creating the Contributor System. In the following image, you can see with which settings we created the Contributor System for this example:
Each encounter needs to be tied to an Organization of type Facility (attribute organization_id from the ENCOUNTER table). An encounter also needs a Facility in the location hierarchy to which the patient is admitted/registered (loc_facility_cd from the ENCOUNTER table). These two organization fields could have different values if, for example, you consider one facility (maybe for billing or security) and separate facility where the actual patient care takes place.
Please note that the Encounter-Organizations security is driven on the organization_id field of the encounter – not the loc_facility_cd field.
When building the Contributor System, in the ORGANIZATION field, we need to select the default Organization/Facility to which encounters will be tied to (organization_id from the Encounter table).
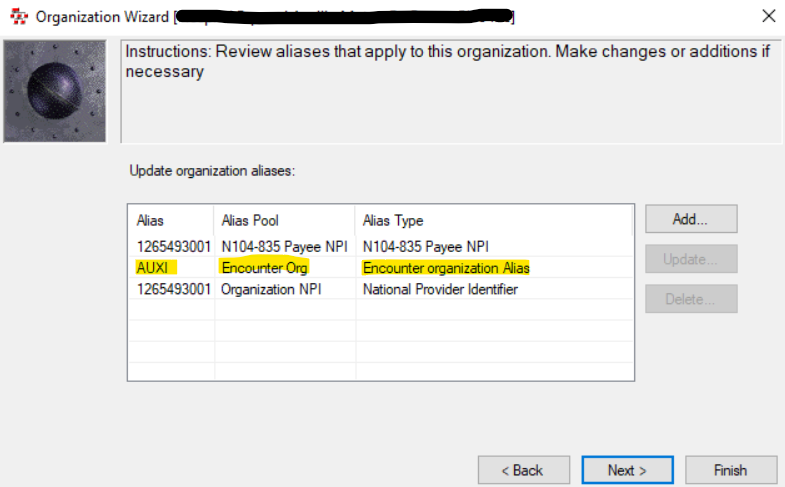
We also selected MSH-04 Sending Facility as the value for the ENCOUNTER ORGANIZATION ALIAS field. This means that the organization for an encounter will be identified by the alias in MSH-04. If the alias in MSH-04 is incorrect, the value from the ORGANIZATION field will be used. The alias expected in MSH-04 must be built in Orgtool or Bedrock as the alias for the Alias Pool of type Encounter organization Alias associated to the Organization/Facility to which we want to tie encounters:
Let’s, we will go through the additional settings for the Contributor System.
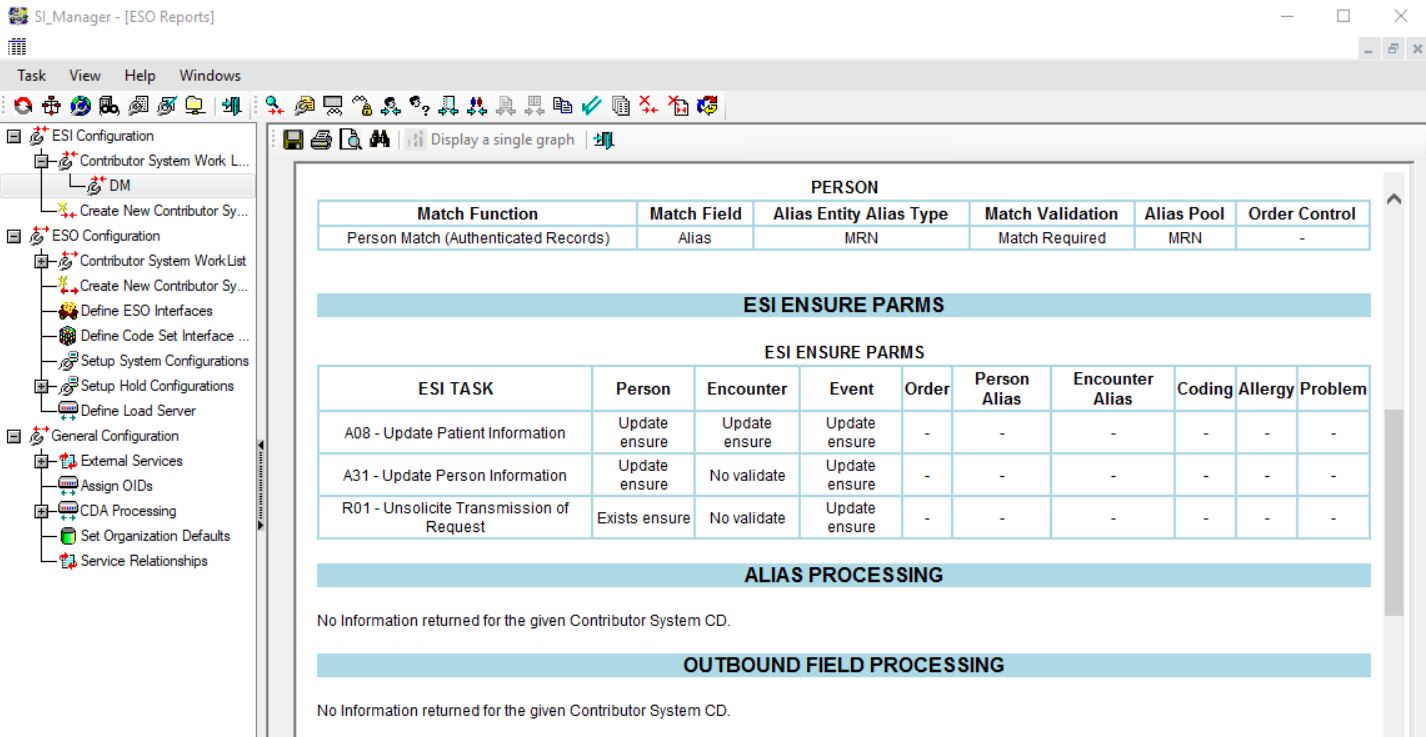
These are the ESI Alias Translation settings:
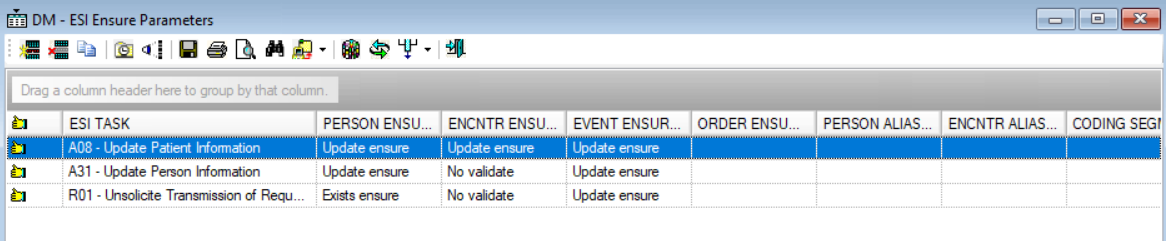
For the ESI Ensure Parameters, we have the following:
We set the Person Match settings like this:

We won’t be using the Person Reconcile parameters as we expect to only migrate one line per patient:

Even though we won’t be doing a encounter migration in this article, let’s set the Encounter Match parameters:

We will also not be using the Personnel Alias settings as we won’t be migrating any references to personnel in this example:

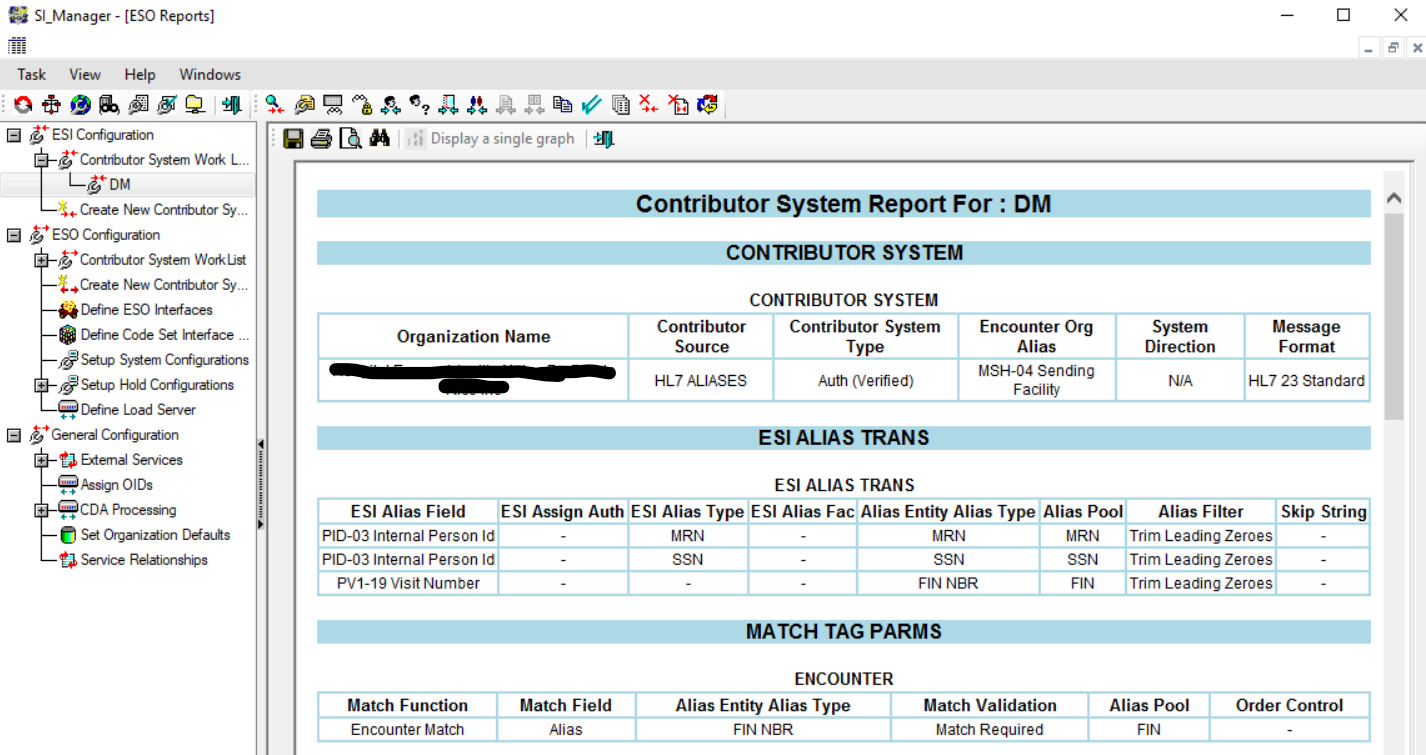
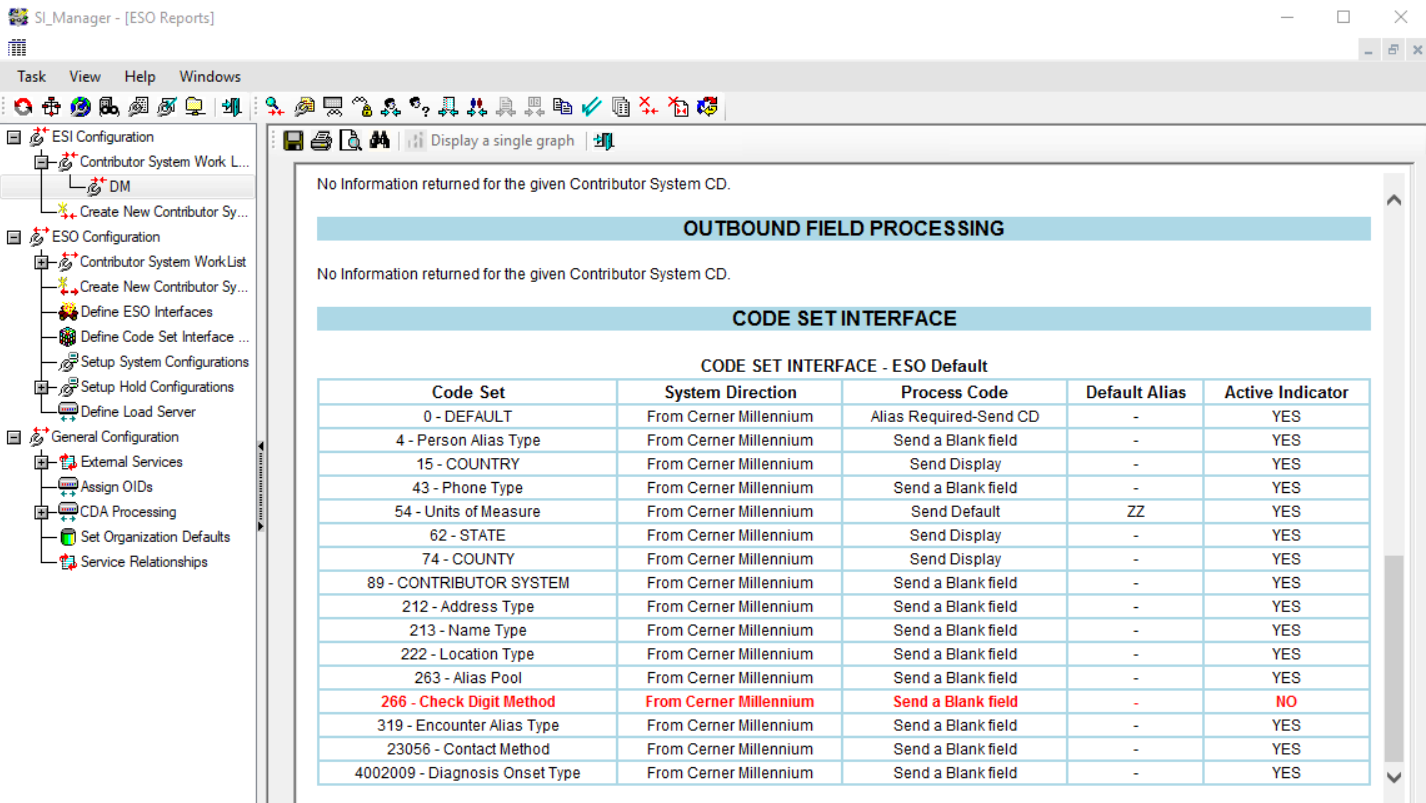
This is how the Contributor System Report would look like:
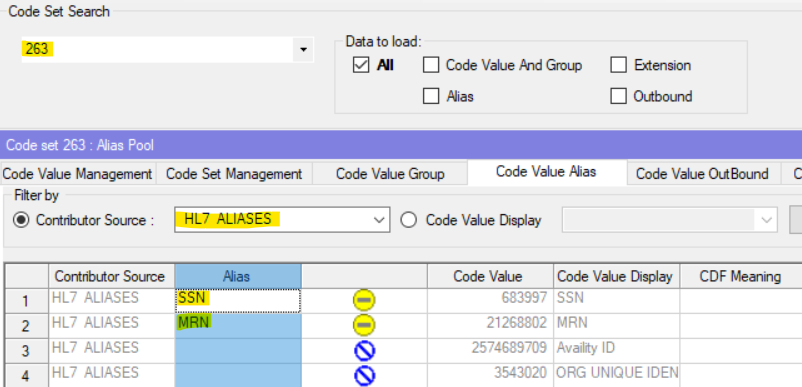
Now, let’s look at the aliases we need to build for the Contributor System and the MRN and SSN alias pools. This is how the Contributor System code value looks like in CoreCodeBuilder:
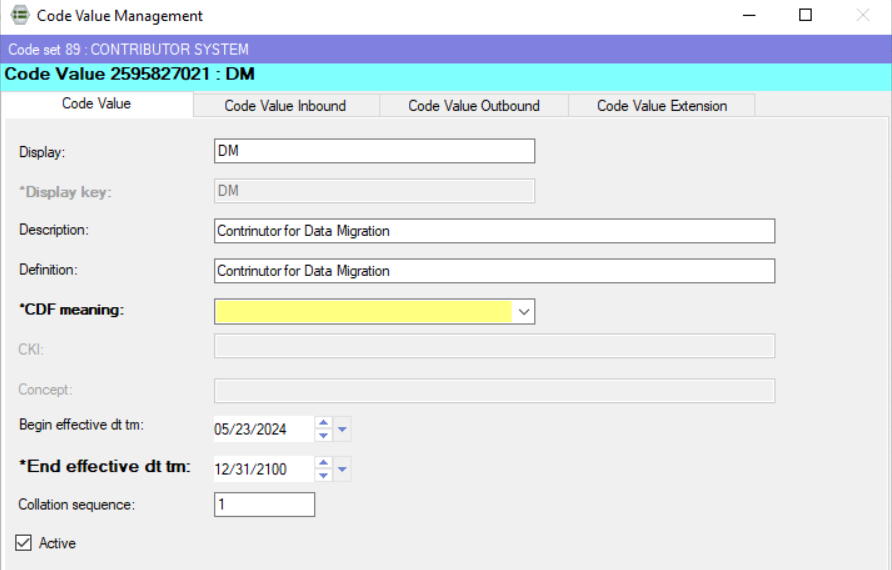
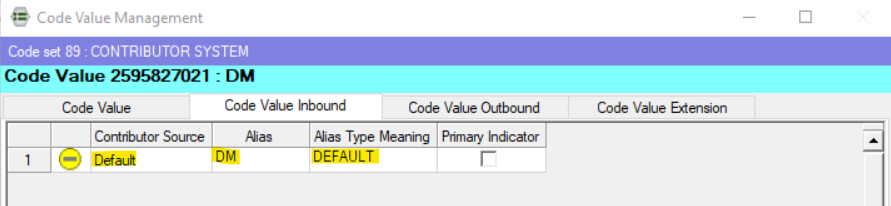
Please don’t make any changes to the code value except for the inbound alias, which should be set up like this:
Also, in CoreCodeBuilder, we need to set the aliases for the MRN and SSN pools:
We have now finished setting up the Contributor System. Let’s move on to building the ESI Comservers.
Building the ESI Comservers #
The Inbound Comserver will read the CSV file with the person data to be migrated and generate an HL7 message for each patient. These HL7 messages will then be distributed between the ESI Comservers. According to our design, the ESI Comservers won’t need to alter the messages in any way as the Inbound Comserver will generate correct messages. But even so, the Inbound Comserver is faster in generating a message than the ESI Comserver in processing it. This means that, if we only had one ESI Comserver, the Inbound Comserver would end up wasting a lot of time waiting for the only ESI Comserver. To avoid this, we build several ESI Comservers and have the messages be distributed between the ESI Comservers through load balancing.
Following are some general recommendations for building ESI Comservers:
- Build 10 ESI Comservers for big migrations. You can of course have a different number and you would need to experiment to see the ideal exact number. However, having to many ESI Comservers won’t slow your migration down.
- Build new ESI Comservers for data migration. Don’t try to re-use existing ESI Comservers – especially if they came with Model Experience.
- Don’t forget to identify the correct node in which to set up the Comservers. PROD environments have two nodes but most of the time, the interfaces are only set up on one of the two nodes.
We will now describe how to create a new ESI Comserver.
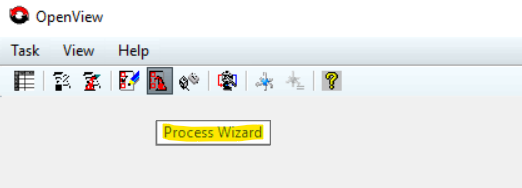
In OpenView.exe, use the Open Engine Process Wizard to start creating a new Comserver:
Give the ESI Comserver a name and a description. Select the ESI option and don’t select a value in the special configuration box:

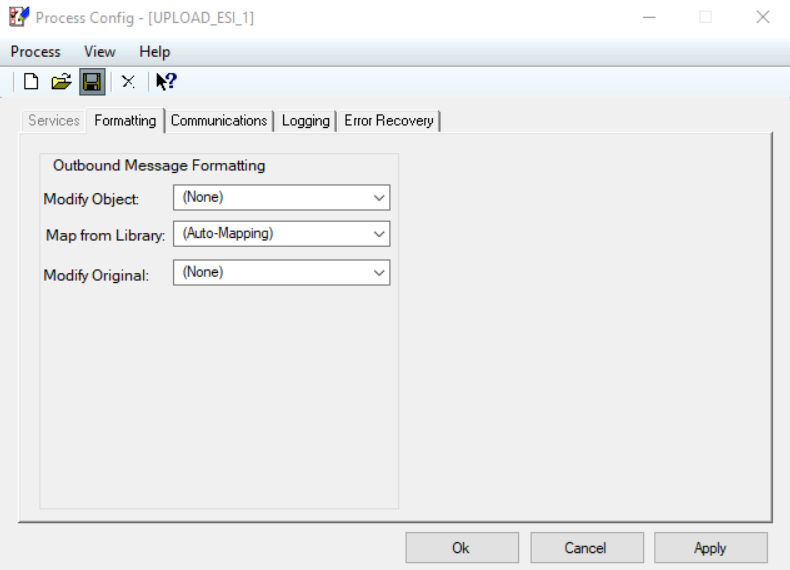
If the Next button is active, the wizard will ask you to select the node on which to create the server. Select the node where all the other servers are built. After clicking the Finish button, you will get the the Formatting tab. Make sure no values are selecting:
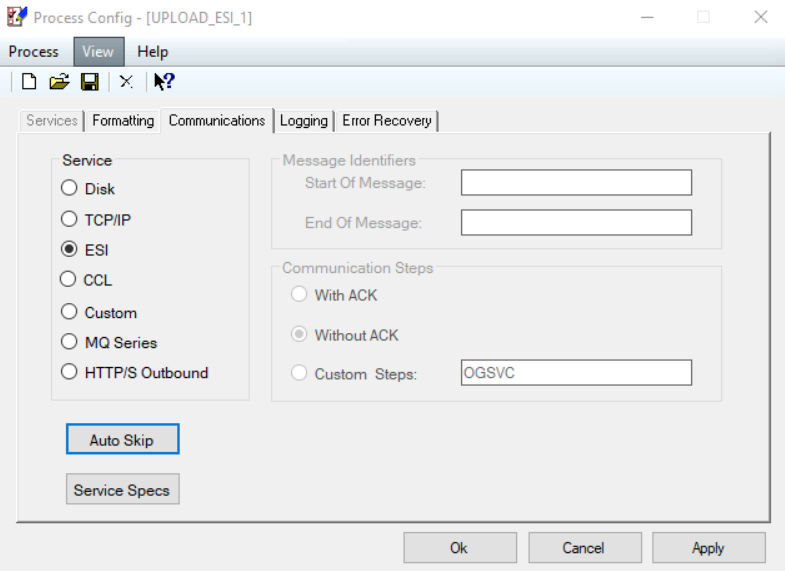
Then, in the Communications tab, don’t make any modifications (keep the ESI option selected):
In regards to Logging, you can in crease the log level while testing but when migration, you should keep the log level low:

Finally, in the Error Recovery tab, set the ENABLEOENSTATUS property to 1. For our example, this is not strictly necessary but it is a good habit to set this property every time you create a new Comserver:

Now, you can click on Apply. The Comserver will be created and you should be able to see it in OpenView.
- sss
- sss
- ddd
Summary:
You can use following CCL to obtain personality traits that were modified away from default as a result of our build steps:
SELECT
	oe.INTERFACEID
	, oe.name
	, current_value = oe.value
	, original_value = oedef.value

FROM
	oen_personality   oedef
	, oen_personality   oe

plan oedef where oedef.interfaceid = 0
join oe where trim(oe.name,3) = trim(oedef.name,3)
and trim(oe.value,3) != trim(NULLCHECK(oedef.value," ",nullind(oedef.value)),3)
and oe.interfaceid = 1068
The result of the CCL should look like this:
Back-end Directories #
For this example development, we will be saving our ccl scripts to CCLUSERDIR/ham/fsi. Please consider using the directory where you store your custom FSI scripts.
The file that will contain the data to be migrated will be stored in CCLUSERDIR/ham/fsi/dm.
You can create directories with the following Linux command:
mkdir <directory-name>
This is how the fsi directory will look:

CSV File containing patient data to be migrated #
For the development of this example, we will be migrating the following person attributes:
- MRN
- SSN
- First Name
- Last Name
- Middle Name
- Sex
This will ne how the CSV file looks like:
80|55667788|JOHN|SMITH|HANNIBAL|M
81|33334499|BOSCO|BARACUS|ALBERT|M
82|12236734|TEMPLETON|PECK|ARTHUR|M
83|34668374|HM|MURDOCK||M
84|23898256|AMY|ALLEN|AMANDA|F
The name of the CSV file will be dm_patients.dat. We will be saving this file in the following directory:

After reading this file, the Inbound Comserver will delete it.
Scripts for the Inbound Comserver #
Before we build the Inbound Comserver, let’s first set up the scriptsthat will be required. For our example, we will need the following scripts and files:
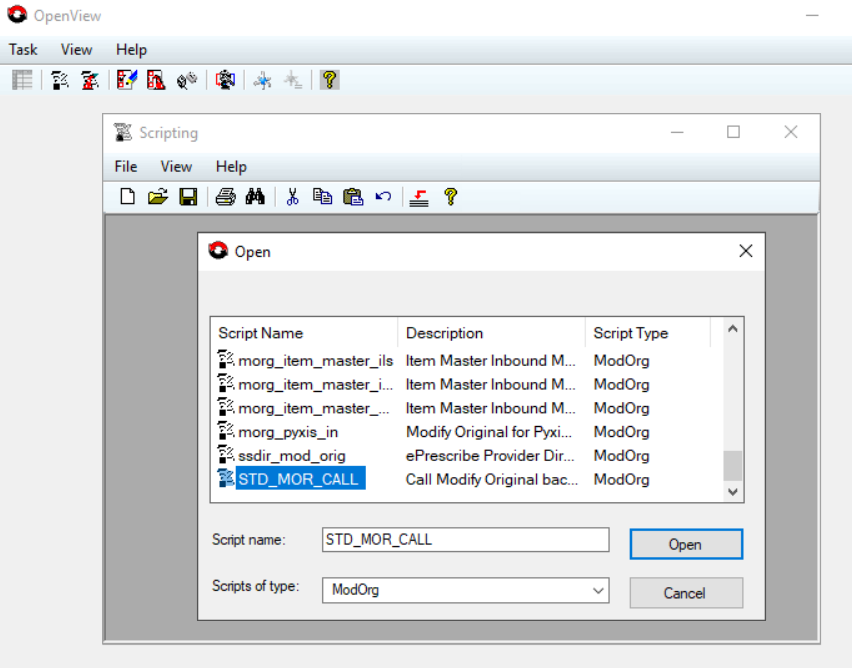
- STD_MOR_CALL (Modify Original)
- oen_hl7functionsv4.inc (DiscernVisualDeveloper)
- oen_patient_dm_record.inc (DiscernVisualDeveloper)
- oen_dm_patient.prg (DiscernVisualDeveloper)
The STD_MOR_CALL scripts is to be created and maintained in OpenView:
The rest of the scripts should be created and maintained in DiscernVisualDeveloper.
Remember that the .inc files must be stored on all nodes of the domain and should be kept in sync. Whenever you make a change to the .inc file on one node, you must be sure the change is also saved to the .inc file(s) on the other node(s). The .prg script should only be stored on the default node. If you make a change in the .inc files, you should compile the .prg script. After compiling the .prg script you need to re-start the Inbound Comserver.
We will now discuss each of the files/scripts listed above.
STD_MOR_CALL (Modify Original) #
This modify original script just runs the CCL object defined as the value for the 9_SCRIPT personality trait. In our case, the object being invoked is OEN_DM_PATIENT. We will set the value for this property when we build the Inbound Comserver.
OEN_DM_PATIENT.prg (CCL program) #
The oen_dm_patient.prg script is a DiscernVisualDeveloper program. As mentioned above, please consider saving the script to the back-end folder where you keep all your custom CCL scripts for FSI. For this example, we will use: $CCLUSERDIR/ham/fsi.
The oen_dm_patient object will run for every line in the CSV file with the patient data to upload. Each run iterates through the corresponding fields (columns). After validating the fields in the line it was called for, the object composes the HL7 message that the Inbound Comserver will send to an ESI Comserver to process.
Before attempting to generate the message for a given line in the CSV file, the oen_dm_patient object validates that the aliases in the CSV line are configured in the domain and the line contains a value for all fields which are set to be required. If an error is detected, the error description is appended to the end of the person_dm.log log file and no HL7 message is generated.
Even though your CSV file may be different from the one attached to this article, it is not expected that you would need to modify oen_dm_patient.prg. The main reason for having to modify oen_dm_patient.prg is if you need to start using a segment that has not been considered for this example.
oen_patient_dm_record.inc (CCL include file) #
Hopefully, most of the changes you need to make to adapt the development of this article to your needs will be in this file. This file lets you set the following:
- MSH fields
- Name and location of log file containing lines from CSV that were not migrated
- Definitions for every field (column) you need to migrate.
We will now describe the settings in this file:
;--1 - Set the field separator & log configuration & msh values
set extract->file_log = "person_dm.log"
set extract->path_file_log = "CCLUSERDIR:/ham/fsi/"
set extract->contributor_system_1 = UAR_GET_CODE_BY("DISPLAY", 73, "HL7  ALIASES")
set extract->contributor_system_2 = UAR_GET_CODE_BY("DISPLAY", 73, "HL7STDSRC")
set extract->csv_separator = "|"
set extract->hl7_event="ADT"
set extract->hl7_trigger="A31"
set extract->sendApplication = "DM"				;MSH-3: Contributor System Default alias
set extract->sendFacility = "Auxi"				;MSH-4: Alias for Encounter Org pool.
set extract->receiveApplication = "HAUXM"		;MSH-5: No effect for patient migration
set extract->receiveFacility = "HAUXM"			;MSH-6: No effect for patient migration.
From the image above, you can see that we set the following:
- extract->file_log: name of log file
- extract->path_file_log = path to log file
- extract->contributor_system_1: main inbound contributor source. The value should be the same as what is defined on the Contributor System.
- extract->contributor_system_2: alternative contributor source. The value should be the same as what is defined on the Contributor System.
- extract->csv_separator: seperator to be used in the CSV person data file.
- extract->hl7_event: The message type to be set in the message (ADT)
- extract->hl7_trigger: The trigger type to be used in the message (A31)
- extract->sendApplication (MSH-3): The default alias value for the Contributor System:
- extract->sendFacility (MSH-4): The alias for Encounter Org pool:
- extract->receiveApplication (MSH-5): For the person migration, we can set this to any value.
- extract->receiveFacility (MSH-6): For the person migration, we can set this to any value.
Inmediatly following the settings above, we set the number of fields to expect in the CSV file with the data to be migrated:
;--2- Set here the number of fields on the extract
 set extract->cnt= 6
 set stat = alterlist(extract->field, extract->cnt)
For the development of this example, we will be expecting a CSV file that will look like this:
80|55667788|JOHN|SMITH|HANNIBAL|M
81|33334499|BOSCO|BARACUS|ALBERT|M
82|12236734|TEMPLETON|PECK|ARTHUR|M
83|34668374|HM|MURDOCK||M
84|23898256|AMY|ALLEN|AMANDA|F
The fields are the following:
- MRN
- SSN
- First Name
- Last Name
- Middle Name
- Sex
Following is how we set up each of the expected fields.
;--3 - Medical record number field
 set z= z+1
 set extract->field[z]->position = 1
 set extract->field[z]->name="Medical record number"
 set extract->field[z]->requiredValue ="Y"
 set extract->field[z]->hl7_segment = "PID"
 set extract->field[z]->hl7_field = 3
 set extract->field[z]->hl7_subfield= 1
 set extract->field[z]->hl7_repeatableField ="Y"
 set extract->field[z]->hl7_patientIdentifier = "Y"
 set extract->field[z]->hl7_assingAuthority ="MRN"

;--4 - Social Security Number field
 set z= z+1
 set extract->field[z]->position = 2
 set extract->field[z]->name="Num SEg Social "
 set extract->field[z]->requiredValue ="N"
 set extract->field[z]->hl7_segment = "PID"
 set extract->field[z]->hl7_field = 3
 set extract->field[z]->hl7_subfield= 1
 set extract->field[z]->hl7_repeatableField ="Y"
 set extract->field[z]->hl7_patientIdentifier = "Y"
 set extract->field[z]->hl7_assingAuthority ="SSN"

;--5 - First Name
 set z= z+1
 set extract->field[z]->position = 3
 set extract->field[z]->name="First Name"
 set extract->field[z]->requiredValue ="Y"
 set extract->field[z]->hl7_segment = "PID"
 set extract->field[z]->hl7_field = 5
 set extract->field[z]->hl7_subfield= 2

;--6 - Last Name
 set z= z+1
 set extract->field[z]->position = 4
 set extract->field[z]->name="Last Name"
 set extract->field[z]->requiredValue ="Y"
 set extract->field[z]->hl7_segment = "PID"
 set extract->field[z]->hl7_field = 5
 set extract->field[z]->hl7_subfield= 1

;--7 - Middle Name
 set z= z+1
 set extract->field[z]->position = 5
 set extract->field[z]->name="Middle Name"
 set extract->field[z]->requiredValue ="N"
 set extract->field[z]->hl7_segment = "PID"
 set extract->field[z]->hl7_field = 5
 set extract->field[z]->hl7_subfield= 3

;--8 - Gender
 set z= z+1
 set extract->field[z]->position = 6
 set extract->field[z]->name="Gender"
 set extract->field[z]->requiredValue ="Y"
 set extract->field[z]->hl7_segment = "PID"
 set extract->field[z]->hl7_field = 8
 set extract->field[z]->codeSet = 57
 set extract->field[z]->verifyAlias = "Y" ; Y/N
 set extract->field[z]->requireAlias = "Y" ; Y/N
As you can see, for each of the fields/columns from the CSV patient migration data file, we specify:
- The position or column number (starting at 1)
- The name of the column: this will be used in the log file to describe the field
- Whether the field is required or not
- The segment and field in which the value must be set
- If applicable, the code set from which the value should be an alias
- If applicable, whether we want the migration program to validate the alias
- Whether the value should be required
- Whether the field in which we want to insert the value is repeatable
- Whether the value corresponds to patient identifier and if so, the assigning authority
Building the Inbound Comserver #
The Inbound Comserver will read the CSV file of patients to be loaded into the database and generate an HL7 message for each line.
Just as with the ESI Comservers, you create the Inbound Comserver with the OpenView Process wizard:
Give the Inbound Comserver a name and a description. Select the Disk option and don’t select a value in the special configuration box:

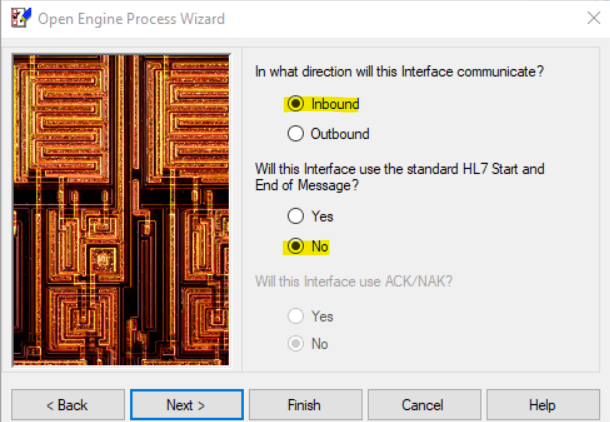
Click Next. Next, select the Inbound option. Also, select the No option as the answer to the question whether the interface will use the standard HL7 Start and End of Messages:
Click Next. In the last step of the wizard, specify the full path and name of the CSV file that will contain the person data to migrate:

As mentioned above, the full path and file name for this example will be:
As when building the ESI Comserver, if the Next button is active, the wizard will ask you to select the node on which to create the server. Select the node where all the other servers are built. After clicking the Finish button, you will get the the Services tab:

Click the Route Setup button. Now we will tell the Inbound Comserver to which ESI Comservers it should send the messages it creates. We will also tell the Inbound Comserver to use a person identifier in the messages to distribute messages between the different ESI Comservers.
Select the ESI Comservers we built before by moving them from the list on the left to the to the list on the right. Also, select the Enable Load Balancing option and make sure you have the following default value for the Load Balancing Field:
PERSON_GROUP.PAT_GROUP.PID.PATIENT_ID_EXT.PAT_ID
In the Formatting tab, fill in the fields as follows:
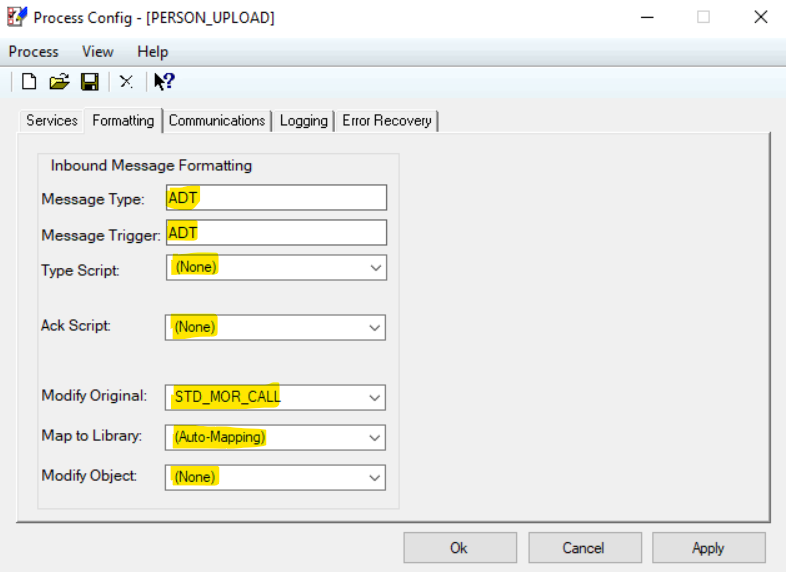
Please remember that we had created the STD_MOR_CALL script above. This script tells the Inbound Comserver that to create each message, it must run the CCL object specified as the value of the 9_SCRIPT personality trait.
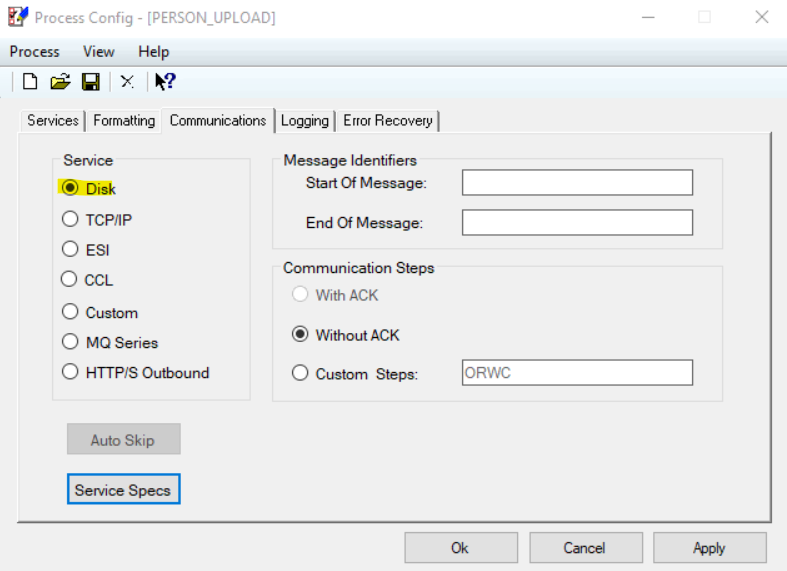
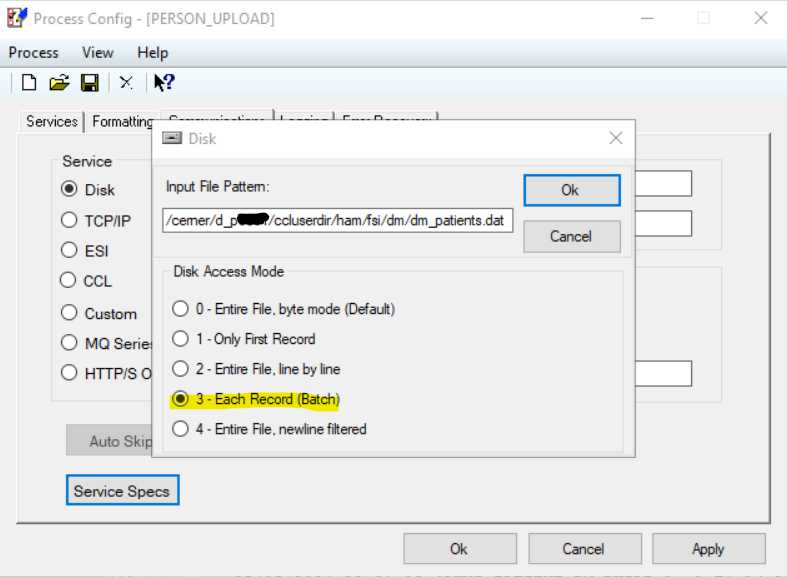
In the Communications tab, select the Disk option (as the Inbound Comserver will be obtaining its data by reading a file saved on the back-end):
The Service Specs must look like this:
On the Logging, tab, when testing, have the settings like this:
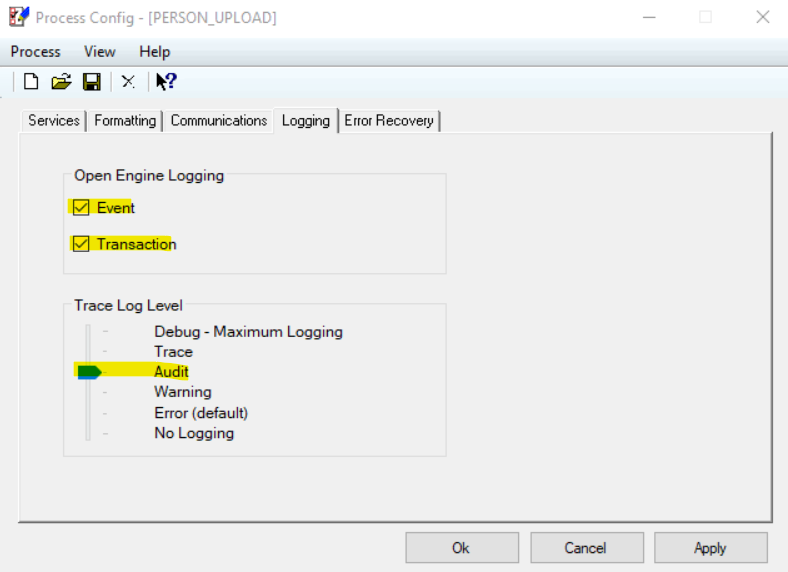
For the real migration, specially for a big migration, you will probably need to bring the log level down.
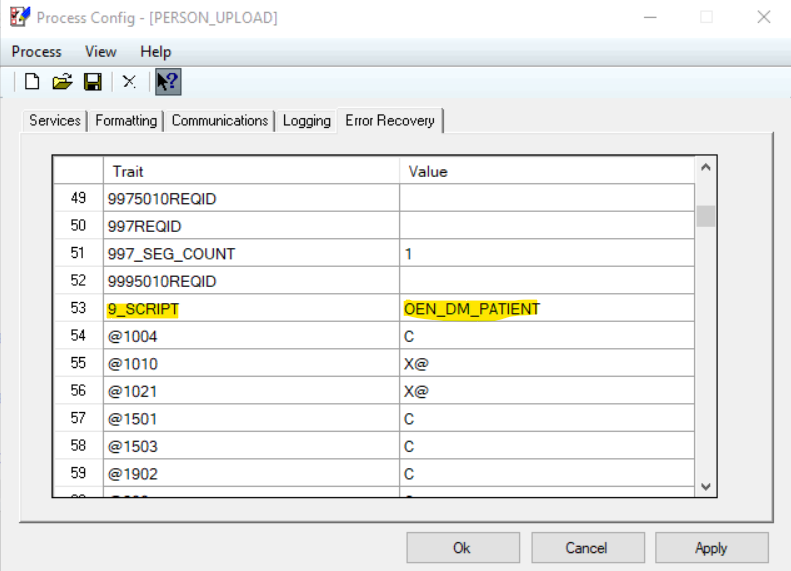
On the Error Recovery tab, set the CCL object name OEN_DM_PATIENT as the name of the 9_SCRIPT personality trait:
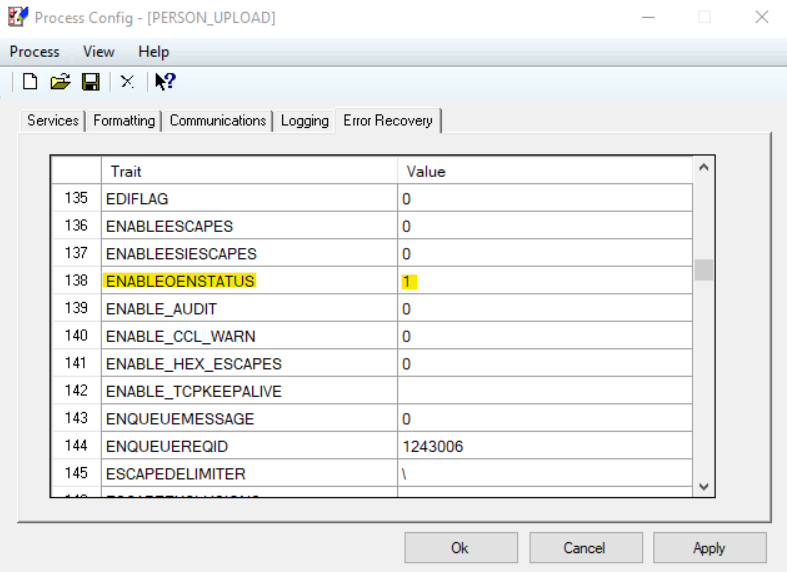
Set to 1 the ENABLEOENSTATUS personality trait:
Now you can click Apply to finish the creation of the Inbound Comserver.
You should have the following in OpenView:
To have detailed log levels while testing, set the log level property for the Inbound Comserver in scpview like this:
modify 725 -prop loglevel=2Now we are ready to do a test patient upload.
Preparing the CSV file with the patient data #
Let’s use the following data in our migration CSV file:
80|55667788|JOHN|SMITH|HANNIBAL|M
81|33334499|BOSCO|BARACUS|ALBERT|M
82|12236734|TEMPLETON|PECK|ARTHUR|M
83|34668374|HM|MURDOCK||M
84|23898256|AMY|ALLEN|AMANDA|F
85|11992288|RODERICK|DECKER||
Please note that we have not specified the sex for the last patient in the file. This is a required field. We will be causing this error on purpose to show how we will see the error in our log file.
Also, be sure to have at least your Inbound Comserver stopped. Once the Inbound Comserver is running and the file is saved, the migration will start. So it’s better to save the file and once you are ready to start the migration, start the Inbound Comserver (and ESI Comservers if they are not started).
As mentioned above, we need to save this file to the directory:
/cerner/d_p..../ccluserdir/ham/fsi/dmWe are now ready to start.
Starting the Migration #
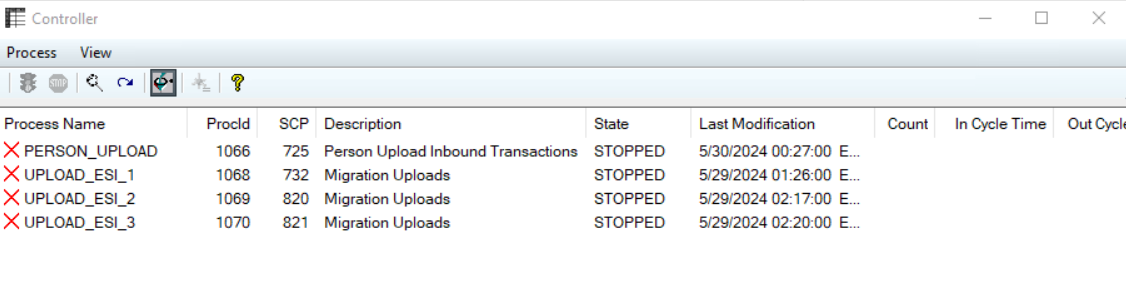
We are ready to test migration. If we were migrating a large file would not start by inspecting the actual messages sent to the ESI Comservers. As this is a very small migration and because we want to see the messages generated by the Inbound Comserver, we will start the Inbound Comserver without having started any of the ESI Commservers. Once we start the Inboud Comserver, we will notice the following:


